What is an exclusion zone?
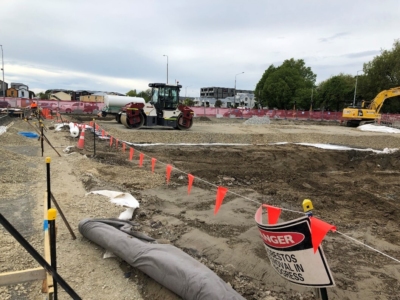
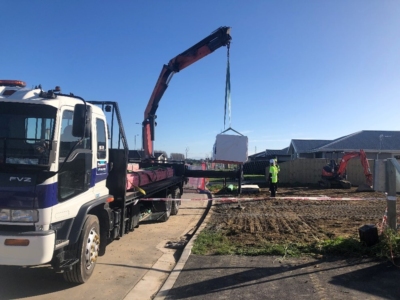
Exclusion zones are commonly used in the construction industry worldwide. For this purpose they are defined locations to prohibit the entry of personnel into danger areas, established through the risk assessment process for a construction activity. An exclusion zone must be a physical barrier put in place to keep workers away from high-risk activities this could include crane operations, excavation works, erecting or dismantling scaffolding, activities using mobile plant or tasks that could expose others who don’t have the correct respiratory protection to harmful substances.
Different Types of Exclusion Zones
Several types of exclusion zones may be used on a construction site. One common type is a “hot work” exclusion zone, an area where welding, cutting, or other types of hot work are performed. These activities can create sparks or other hazards that could ignite flammable materials, so keeping other workers out of the area until the work is completed is important.
Another type of exclusion zone is a “fall or drop protection” zone, an area where workers may be at risk of falling from a height. This could include areas around open pits, holes, or other openings in the ground or areas where workers are working on elevated platforms or dismantling or erecting scaffolding. In these situations, it is important to establish an exclusion zone to keep workers out of harm’s way.
Exclusion zones can also protect workers from hazardous materials or substances. For example, suppose a site contains asbestos or workers are cutting fibre cement so there is a risk of exposure to silica. In that case, an exclusion zone can be established to keep workers away from the area until properly cleaned and decontaminated. Similarly, if a site contains hazardous chemicals or gases, an exclusion zone may be necessary to keep workers out of the area until the hazards have been removed or properly contained.
Why do we need them?
Exclusion zones isolate high risk work by preventing access to the dangerous areas. Exclusion zones must be formed to keep those not involved in the task safe. You need to consider whether your tasks on site involve any of the following:
• Mobile plant - Being struck/crushed by plant
• Crane or hi-ab operation – loads can fall
• Harmful substances e.g., dust from cement that can be inhaled/paint fumes
• Overhead works including roof installations, or any work done on scaffold where material could fall off
• Nail gun use – flying projectiles
Those working within the exclusion zone can be specially trained and must wear specific PPE.

What should they look like?
The exclusion zone should consist of something physical which would prevent workers walking into the area unhindered. They can be formed with cones & tape, bunting or poles, plastic barriers, or temporary fencing, with warning signage highlighting the danger.
The exclusion zone must be a physical barrier. This can be formed with cones and either barriers, danger tape or rope and flags.
- Consider what area should be excluded. In other words, where items can fall. This could be the ground outside the scaffold, the ground between the scaffold and the building or on the scaffold itself. The exclusion zone cannot be placed on the face of the scaffold.
- Use signage to highlight that overhead works are taking place.
- Ensure access out of the door is also excluded.
- Regularly check the exclusion zone is in good condition and that wind or another contractor hasn’t affected it.
- If you require access through the exclusion zone, get the attention of those managing it and ask their permission. Wait until they say it is safe to do so. DO NOT simply lift the barrier and enter the zone. These are there to protect you from hazards and may save your life.

What to do if you require to enter an exclusion one
You may need to enter an exclusion zone to gain access to a house or another part of the site beyond it.
- Never enter an exclusion zone without permission from the contractor in charge of it.
- Wait until they say it is safe to do so. This may involve their works stopping until you safely travel through the area.
- Always follow the instructions given.
A great way to do this is the Thumb up Procedure
Here are some steps for using the Thumbs Up procedure on construction sites:
- Communicate the Thumbs Up procedure to all workers on the site. This could be done through a safety briefing or training session.
- Before beginning any task, each worker should give a thumbs up to indicate that they understand the task and any related safety procedures.
- If a worker is unsure about any aspect of the task or the safety procedures, they should not give a thumbs up. Instead, they should raise their hand and ask for clarification before proceeding.
- If a worker observes another worker not following the Thumbs Up procedure, they should intervene and remind the worker to follow it.
- Supervisors should regularly check in with workers to ensure the Thumbs Up procedure is followed.
Using the Thumbs Up procedure on construction sites can help reduce the risk of accidents and injuries by ensuring that all workers are fully aware of their tasks and any related safety procedures. It can also promote open communication and encourage workers to speak up about any concerns.
